Pagina's

donderdag 27 september 2018

3-layer kaartje


Hallo iedereen,
Ik ben ondertussen terug van vakantie.
Vandaag geef ik jullie iets meer uitleg over dit kaartje, namelijk het 3-lagen kaartje.  
Ik vind ze enorm leuk om te doen, het geeft iets extra vind ik persoonlijk.

Hi everybody,
I am back from my vacation.
Today I will give you this beautiful 3-layer card. 
 I really like to make these, it gives the card something extra I think


Je begint met het kiezen van je cardstock als achtergrond, 
ook het cardstock waarop je de kaartjes gaat matten.
Ik heb hier voor een grijze achtergrond gekozen 
met een soort turqoise waarop ik ga stencillen.
De maten van de kaartjes heb ik hieronder op de foto bijgeschreven.


You start by choosing your cardstock for the background as well as the cardstock for the matting of the layers.
I've chosen for a grey matting paper,
and a nice turqoise for my stencilling.
The measurements are in the pictures below


Om te beginnen neem je een lijmroller die niet permanent is, 
en plak je de drie kaartjes die je gaat bewerken op elkaar.  
Ik plak ze onderaan vast met een stukje washi tape, 
zodat ze niet gaan bewegen wanneer ik spons.

To start off, you take a non permanent glue runner or tape, 
and layer the 3 pieces of cardstock.  
On the bottom I put a piece of washi tape, 
so that they can't move around when I'm sponging on my colour


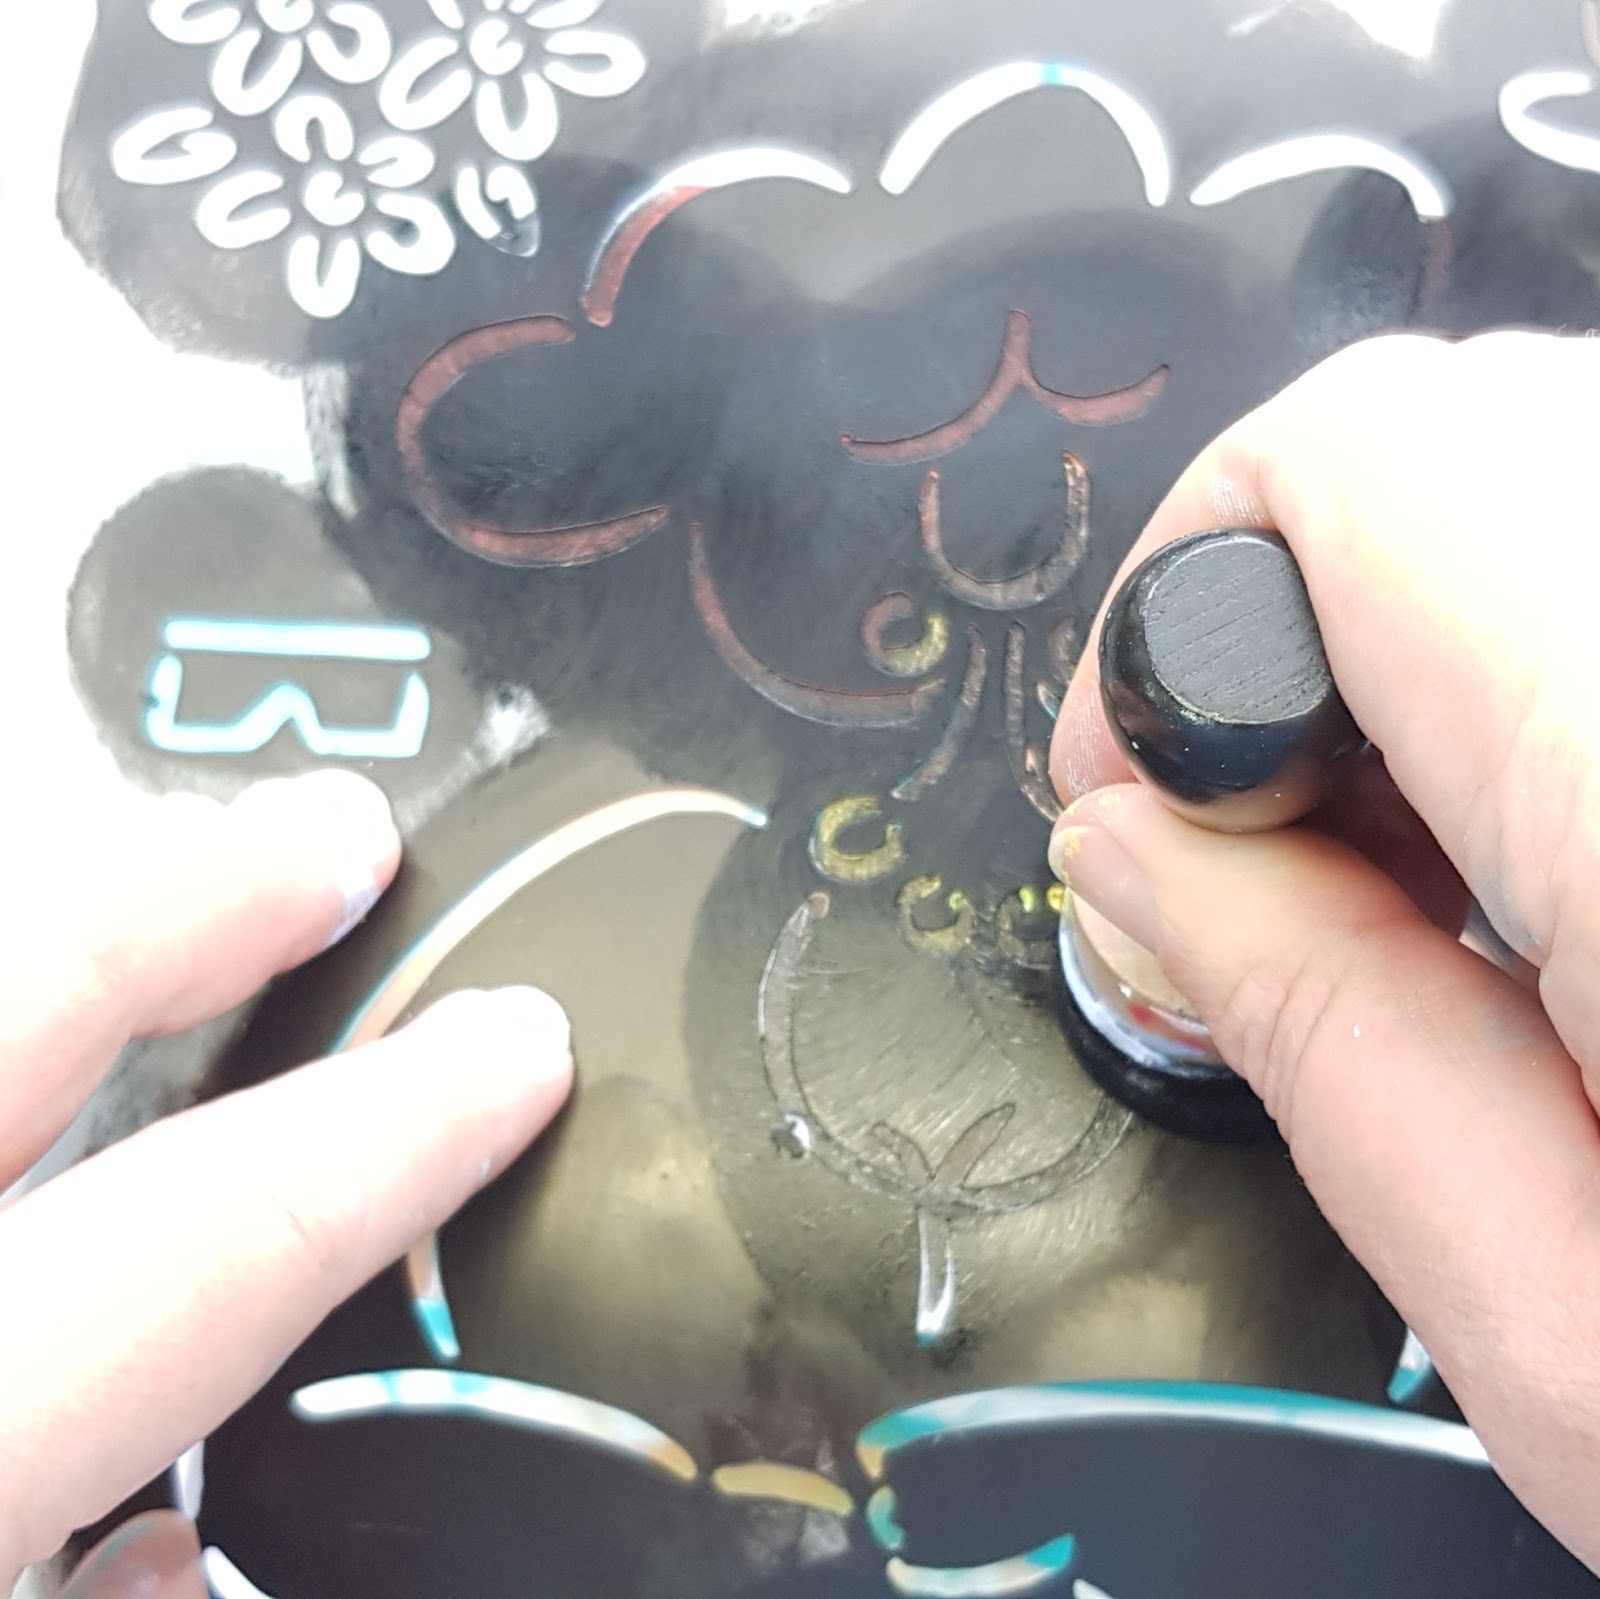
De volgende stap is om je stencil goed vast te maken op je craft mat.
Ik gebruik hier de grunge 2 stencil (470.801.052)

The next step is to secure your stencil on your craft mat
I am using the Grunge 2 stencil (470.801.052)


Neem de inkt die je wilt gebruiken, en gebruik een vingersponsje (een ander sponsje gaat natuurlijk ook perfect).  Ik heb gekozen voor dezelfde kleur inkt als mijn cardstock, dat geeft een mooi diep effect.

Take your ink, and use a finger dauber, (another kind of sponge works as well).
I've chosen for the same colour of ink, that matches the cardstock. 
I really like the look of that


Als je tevreden bent met je inkten, haal je de stencil weg, en zie je dat alle 3 de laagjes mooi één geheel vormen.  Neem vervolgens de tekst die je wilt stempelen. ik heb een stempelhulp gebruikt, want ik ken mezelf, anders stempel ik gegarandeerd schuin :-)

When you are happy with your inking, remove the stencil, and you will see that the 3 layers will be alligned perfectly.
Then take your text stamp of your choice.
I've used a stamping tool, because I know myself, I will definitely stamp crooked :-)


Als laatste haal je de laagjes voorzichtig van elkaar, en mat je ze afzonderlijk op het bijbehorende cardstock.  Let hier wel op dat je ze niet ondersteboven plakt, want dan klopt het plaatje niet meer.
Vervolgens heb ik wat decoratie aangebracht, en met een witte gelpen wat accenten.
Ik ben blij met het resultaat

Finally you take the layers apart, really careful.  And glue them on to the cardstock.  Pay attention to tape them all the correct way, or the picture will not be the same again.
I have put on some rhinestones, and added some accents with my white gelpen.
I am really pleased with the result of this card


Bedankt voor het kijken op de blog, en plaats jullie creaties graag in de Facebook groep
Fijne dag

Thank you for watching, and please, share your creations on our Facebook group.
Have a nice day


donderdag 20 september 2018

Quick and easy card

Hallo allemaal,

Vandaag heb ik een snel en simpel kaartje gemaakt voor jullie. Ik heb hierbij de foamstempel Lovely Lady by Julia 494.904.002 centraal gesteld.
-
Today I made a quick and easy card for you. I've used the foamstamp Lovely Lady by Julia 494.904.002 as my focal point.


Als eerste heb ik de foamstempel afgedrukt en deze ingekleurd met Ecoline Brush pennen.
-
At first I printed the foamstamp and colored the image with my Ecoline Brush pens. 


Daarna heb ik een rode achtergrond gemaakt. Hierop heb ik het rijtje met de rondjes meerdere keren herhaald door het stencil steeds een stukje te verplaatsen. Zo heb ik een mooi patroon voor de achtergrond van mijn kaart.
-
After that I painted a red background. On that background I used the row of circles by stencilling it multiple times. Every time I moved the stencil a few centimeters. This way I created a nice background for my card. 


Deze beide onderdelen plak ik samen op een witte basiskaart. Samen met een tekststempel heb ik zo snel een leuke kaart gemaakt.
-
Then I glue the both parts of my card on a white basecard. Together with a sympathy stamp I made a quick and easy card.  


Ik hoop jullie met deze kaart te hebben kunnen inspireren ! Ik ben benieuwd naar wat voor kaarten jullie met deze stempel maken !
-
I hope I have inspired you with this card ! I am curious to see what kind of cards you are making with this stamp ! 

Met hartelijke groeten,
With kind regards,


maandag 17 september 2018

Artjournal project by Julia


Ik vind het heerlijk om in mijn artjournal te werken in deze video kun je zien hoe ik dit project heb gemaakt.

  I love to work in my art journal in this video you can see how I made this project . 


Ik heb de achtergronden met inkten en diverse stencils gemaakt. Laag overlaag net zolang totdat ik ze mooi vond. Ook heb ik opgelet dat de kleuren van de pagina's steeds contrasterend was zodat effect van kleur verschil groter is als je de pagina omslaatl.

I made the backgrounds with inks and various stencils. Layer over layer as I am ready when I liked them. The colors of the pages are always contrasting so that the effect of color difference is greater when you turn the  the page.


Naast dat ik de vogeltjes en de takjes met bladeren heb gestempeld en gekleurd. Heb ik afbeeldingen can mijn kleurboekje gecopieerde en vergroot en ingekleurd met de Derwent Inktense. Deze is na droging watervast en dat is fijn als jij je afbeelding opplakt met medium. Kleuren geven dan niet meer af ;-) Hier heb ik een afdruk gemaakt van mijn Classy Lady stencil.

Beside that I have stamped and colored the birds and the leaves. I have copied and enlarged my coloring book illustrations from my Lovely Lady Summertime book and colored it with the Derwent Inktense. When dried it is waterresistand and that is nice. If you stick your image on with medium. The colors no longer give off colors ;-) Here I have made a print of my Classy Lady stencil.


Mijn losse tags heb ik ook toegevoegd aan dit project. Nu alleen nog leuke quotes ik ben tevreden het is een mooi geheel geworden. Veel plezier bij het kijken. Tot een volgende keer 
Julia

I also added my separate tags to this project.I put some nice quotes and I am satisfied it became  a beautiful project. Have fun watching the video
Till next time
Julia


Ik heb de volgende Pronty-materialen gebruikt:

I used the following Pronty materials:

Stencil Classy Lady by Julia (470.765.003)
Stencil Boarders by Julia (470.765.002)
Foam stempel Flower + Twig by Julia (494.904.001)
Foam stempel Birds by Julia (494.904.003)


Op onze Facebook-pagina Pronty and friendskun je laten zien wat jíj hebt gemaakt met Pronty producten. We zijn erg benieuwd!


On our Facebook page Pronty and Friends you can show what yóu made with Pronty products. We look forward to see your artwork!


vrijdag 14 september 2018

Dikke dames / Lovely Ladies mixed media

Hallo en welkom,

Je hebt ze al diverse malen voorbij zien komen, en ook ik ben helemaal weg van die leuke Dikke Dames stencils en de foam stempels van Julia Woning. Ik heb er een 30 x 30 cm mixed media stuk mee gemaakt. 
-
Hello and welcome,


I guess you have seen the Lovely Lady stencils and the new foam stamps by Julia Woning already. They are so wonderful to work with and I made this 30 x 30cm mixed media piece with these products.


De achtergrond had ik een hele tijd geleden al gemaakt. Eindelijk kreeg het vel een goede bestemming. Het is gemaakt op A3 mixed media-papier waarop distress inkt is gesponsd, waarna ik door verschillende stencils met dezelfde kleuren nog eens sponste. Hieruit sneed ik een stuk van 30 x 30cm.
-
The background was made a while ago. I finally had the right project to use it for. It is made on A3 mixed media paper on which I sponged distress inks. On top of that I sponged the same colours again, this time through various stencils. From this sheet I cut a 30 x 30 cm piece.


Hierop stempelde ik met oxide inkten de takken (met groen) en de bloemen (met paars). Deze kleurde ik met Neo-colour 2 en water.
-
On this piece I stamped the leaves (in green) and the flowers (in purple) with oxide inks. I coloured them with Neo-colour 2 and water.


Ook de basis voor de dikke dame en de vogeltjes had ik al liggen. Deze basis is als volgt gemaakt: met de inktpads wreef ik rechtstreeks op het papier om vlekken te maken. Hier en daar werkte ik het bij met een blending tool. Daarna stempelde ik met natte foam stempels op het papier om kleur af te nemen. Ook legde ik stencils op het papier, spoot het een beetje nat en depte af met een stukje keukenpapier.
-
The base for the lovely lady and the birds was also made earlier. This is how I made it: with various ink pads I rubbed directly over the paper, later blending a little with a blending tool. Then I stamped with wetted foam stamps to take off some colour. I also put some stencils on the paper, sprayed with water and blotted with a paper towel.


Daarna tekende ik met behulp van het stencil de dame er op. Op een ander stuk stempelde ik de vogeltjes. Andere delen van de dikke dame (het haar, gezicht en armen) nam ik over op andere (nieuw gemaakte) gekleurde stukken papier en knipte alles uit.
-
Then with the template I drew the Lovely Lady on one piece, and stamped the birds on another piece. Other pieces of the lady (the hair, face and arms) I traced onto newly made pieces. Then I cut out all pieces.


Ik kleurde hier en daar nog wat aan de vogeltjes en de dame om wat meer diepte te krijgen en plakte de verschillende onderdelen op mijn achtergrond. Met een zwarte stift bracht ik zwarte details aan: op de dame en op de bloemen en bladeren. Hier en daar gebruikte ik ook wit. Op de achtergrond stempelde ik wat extra details.
-
I added some colour to the birds and the lady to get some more depth and adhered all pieces to my background. With a black marker I added lines on the lady and the flowers and leaves. I used some white as well. I stamped lightly on the background to add some interest.


Ik heb de volgende Pronty-materialen gebruikt:
-
I used the following Pronty materials:

Stencil Lovely Lady by Julia (470.765.001)
Foam stempel Flower + Twig by Julia (494.904.001)
Foam stempel Birds by Julia (494.904.003)

Foam stempel Spiral (494.001.011)
Foam stempel Dry Ground (494.001.012)
Stencil Grunge 1 (470.802.072)
Stencil Haringbone (470.802.057)
Stencil Gel Bubble (470.803.035)
-
Op onze Facebook-pagina Pronty and friends kun je laten zien wat jíj hebt gemaakt met Pronty producten. We zijn erg benieuwd!

Groetjes,
-
On our Facebook page Pronty and Friends you can show what yóu made with Pronty products. We look forward to see your artwork!

Kind regards,


dinsdag 11 september 2018

Toolbox by Julia Woning

Toolbox 

Vandaag laat ik je zien hoe ik dit project heb gemaakt, onderaan dit artikel staat een film het eind resultaat.

Today I will show you how pimp up my toolbox. 


Eerst lijm ik de tool box in elkaar ik laat een aantal tussen schotjes weg omdat ik grote vakjes wil. Dan geef ik alles met acrylverf een kleur en hier en daar met een stencil van de Pronty crafts by Jukia Woning lijn de boarders.

First I glue the toolbox together. Then I give it a colour with acrylics. Some decoration with the Boarders from Pronty Crafts by Julia Woning.


Dan gebruik ik mijn stencil als mal. En teken de dames op de zijkant van de tool box.

Then I use my stencil as a mold tovdraw the Lovely Ladies on the side of the toolbox.


Met acryl verf geef ik de dames kleur.

Then with acrylics I give the ladies colour.


Wanneer het acrylverf gedroogt is breng ik met de stencils nog een afdruk. Met zwart acrylverf en een blendingtool maak ik de afdruk. Ik ben tevreden hoe mijn dames zijn geworden.

When the acrylics dried I put down a stencil and with a blending tool and black acrylic paint I make the stencil print. Love the look of my ladies.


Dan is het tijd om de ander vlakken op te pimpen met mijn stempels. Deze heb ik op papier gestempeld , gekleurd met inktense en opgeplakt met mat medium. Doordat de inktense na droging water vast is geeft het geen kleur meer af als je met medium plakt.

Then its time to pimp up the rest of the toolbox. With my stamps I make a print on paper and give them colour with the Derwent inktense. Them I glue it al with mat medium on the toolbox.

Bekijk het eind resultaat op de film hier onder.
Op onze Facebook-pagina Pronty and friends kun je laten zien wat jíj hebt gemaakt met Pronty producten. We zijn erg benieuwd! Veel plezier en creativiteit gewenst tot de volgende keer.


Julia

See the finished result in the film. On our Facebook page Pronty and Friends you can show what yóu made with Pronty products. We look forward to see your artwork! Lots of creativity and fun, till the next time.

Julia 


Ik heb de volgende Pronty-materialen gebruikt:

I used the following Pronty materials:

Stencil Lovely Lady by Julia (470.765.001)
Stencil Classy Lady by Julia (470.765.003)
Stencil Boarders by Julia (470.765.002)
Foam stempel Flower + Twig by Julia (494.904.001)
Foam stempel Birds by Julia (494.904.003)


Used products:

Pronty crafts toolbox

Pronty Crafts by Julia Woning:
Stencils:
Lovely Lady
Classy Lady
Boarders

Foamstamps:
Birds
Twig & flower