Pagina's

maandag 30 oktober 2017

High heel girl poster

Oktober.. de herfst.. Halloween en langzaam nadenken over de feestdagen en de kerstdagen.

Ik wil jullie vandaag een poster laten zien die ik gemaakt heb met diverse Pronty Crafts mask stencils.
-
October.. Autumn.. Halloween and the beginning of thinking about Christmas and the other holidays.

Today I would like to show you a poster that I made with some of the Pronty Crafts mask stencils.


Op groot vel plaats ik de dame uit de Pronty Crafts mask stencil High Heel Girl 470.802.022 en om haar heen breng ik vervolgens kleur aan op de pagina.
-
I use the girl from the Pronty Crafts mask stencil High Heel Girl 470.802.022 and I add some colour around her.


Om haar heen werk ik daarna met het Pronty Crafts mask stencil Mini square explosion 470.801.042 zodat het lijkt alsof ze voor een soort van discobal staat.
Daarna gebruik ik diverse andere Pronty Crafts mask stencils voor de rest van de achtergrond.
 -
Around the girl I use the Pronty Crafts mask stencil Mini square explosion 470.80.042 so it looks like she is standing in front of a disco ball. For the background I the use several other Pronty Crafts mask stencils.


Om nog wat reliëf te krijgen op de 'discobol' breng ik nog wat glass beads aan met behulp van het Pronty Crafts mask stencil Mini square explosion 470.801.042. Laat goed drogen.
 -
To get more dept on the 'disco ball' I add some glass beads with the help of the Pronty Crafts mask stencil Mini square explosion 470.801.042. Make sure to let it dry well.


Hierna mat ik de pagina op zwart kraft papier en is mijn poster klaar. Ik hoop dat ik je heb weten te inspireren om ook zelf een poster te maken met de hulp van de Pronty Crafts mask stencils.

Hartelijke groet,
 -
After drying I've adhered my paper to a piece of black cardstock and my poster is ready. I hope I've inspired you to create your own poster with the help of the Pronty Crafts mask stencils.

Kind regards,


zaterdag 28 oktober 2017

100% relaxed

Voor het maken van een aantal kaartjes ben ik aan de slag gegaan met de Pronty Crafts mask stencils Pattern triangles 470.803.043 en Squares 470.801.046.
-
I've used the Pronty Crafts mask stencils Pattern triangles 470.803.043 and Squares 470.801.046.


Ik heb de eerste achtergrond voor mijn kaart gemaakt door met wat inkt en een blending tool in draaiende bewegingen over het Pronty Crafts mask stencil Squares 470.801.046 te gaan.
-
I've created the first background by using some ink and a blending tool to go over the Pronty Crafts mask stencil Squares 470.801.046 in a circular motion.


Vervolgens herhaal ik deze stap met een andere kleur inkt en het Pronty Crafts mask stencil Pattern triangles 470.803.043.
-
I then repeat this step with another colour ink and the Pronty Crafts mask stencil Pattern triangles 470.803.043.


De achtergrond is nu klaar om op te stempelen.
-
The background is now ready to be stamped on.


Als laatste teken ik met zwarte pen nog een lijntje en mat ik de achtergrond op zwart cardstock.
-
Finally I draw a line around the edges with a black pen and then I adhere the background to a piece of black cardstock.


Ik maakte met dezelfde Pronty Crafts maskstencils maar met andere kleuren inkt en stempels nog een paar andere kaarten. Ik hoop dat ik jullie heb kunnen inspireren om ook met deze mooie Pronty Crafts mask stencils aan de slag te gaan.

Hartelijke groet,
-
I made a few other cards with the same Pronty Crafts mask stencils, but with other colours of ink and different stamps. I hope I've been able to inspire you to use the beautiful Pronty Crafts mask stencils as well.
Kind regards,


donderdag 26 oktober 2017

T shirts

Vandaag laat ik jullie zien hoe je met de Pronty Crafts mask stencils je t-shirt kunt bewerken. De grote mask stencils zijn hier namelijk perfect voor!
We werken met bleek, dus pas op voor de omgeving en je kleding. Ik raad je aan buiten te werken in verband met de mogelijke giftige dampen.

Dit heb je nodig:
- Pronty Crafts mask stencils
- effen t-shirts
- bleek
- spuitflesje (met fijne spray)
- stuk karton op maat van je t-shirt
- kranten of plastic
- papieren keukenrol
-
Today I want to show you how you can decorate your t-shirts with the Pronty Crafts mask stencils. The large mask stencils are just perfect for this!
We are going to work with bleach, so you want to be careful with your surroudings and your clothes. I advise you to work outside because of possible toxic fumes.

This is your supply list:
- Pronty Crafts mask stencils
- uni coloured t-shirts
- bleach
- spray bottle (fine nozzle)
- cardboard, the size of your shirt
- newspaper or plastic
- paper kitchen towel

 
Voor mijn shirts gebruikte ik de volgende Pronty Crafts mask stencils:
Panther 470.805.035
Dreamcatcher 470.653.027
Spring Flower A5 470.802.004
-
For my shirts I used the following Pronty Crafts mask stencils:
Panther 470.805.035
Dreamcatcher 470.653.027
Spring Flower A5 470.802.004


Schuif het karton in je t-shirt, zodat je het shirt strak kunt leggen en er geen bleek naar de achterkant doorloopt. Leg het Pronty Crafts mask stencil op je shirt. Vul een spuitflesje met bleek en een klein beetje water.
-
Put the cardboard inside your t-shirt so you can lay your shirt flat, and to prevent bleach from seeping through. Put your chosen Pronty Crafts mask stencil on the t-shirt. Fill a spray bottle with with bleach and a little water.


Spray nu voorzichtig over je stencil, van een afstandje van ongeveer 30 cm. Laat even intrekken en spray zo nog een aantal malen. Dep het teveel van je stencil af met een keukenpapiertje, anders loopt het onder je stencil.
Je kunt voorzichtig het resultaat bekijken door met één hand het stencil vast te houden en met de andere hand voorzichtig een eindje op te tillen. Let op: bleek werkt nog lang na, dus soms kan het even duren voor je resultaat ziet.
-
Carefully spray the bleach over your shirt, from a distance of ca. 30 cm. Leave for a little while, then spray again and repeat. Blot the bleach from your stencil with a paper towel, to prevent it from seeping under the stencil.
You can see the result by lifting up the stencil, while holding it in place with your other hand. Bleach still works after a little while so it can take a few minutes before you see the result.


Wanneer je tevreden bent over het resultaat spoel je het t-shirt goed uit met water en wast het in de wasmachine. Laat je het te lang liggen, dan is je afdruk niet goed scherp meer.
-
When you have the result you were going for, rinse thorougly in water and wash your shirt. If you leave you shirt too long, the image will not be as sharp.


Je kunt een stencil één keer gebruiken, of verleggen voor meerdere afbeeldingen (zoals op deze foto).

Tot slot:
Niet alle soorten t-shirts bleken even goed, probeer het evt met een klein hoekje in de onderste boord. En dit werkt vast ook op bijvoorbeeld spijkerbroeken, leef je uit!

Ik hoop dat ik je geïnspireerd heb om ook aan de slag te gaan met de toffe Pronty Crafts mask stencils. Het is namelijk erg leuk om je eigen kleding te pimpen en dan te dragen.

Hartelijke groet,
-
You can use the stencil once, or repeat the pattern on different places on your shirt (as you can see in this picture)

Note:
Not all kinds of shirts bleach equally well, you can test on the inside of the bottom seam.
And I guess this will work on jeans too, enjoy!

 I hope I have inspired you to try using the awesome Pronty Crafts mask stencils for this technique. It's so much fun to pimp your own clothes and wear them.

Kind regards,


vrijdag 20 oktober 2017

A set of wall decoration boxes for my craft room


Ik ben dol op het Pronty Crafts mdf en ben deze keer aan de slag gegaan met de set muur decoratie kastjes 460.423.670 in 3 maten. Zij zullen mooi staan in mijn pas opgeknapte hobbykamer.
-

I just love the Pronty Crafts mdf and so I decided to decorate the set of wall decoration boxes 460.423.670 in three sizes this time. They will look nice in my newly renovated craft room.


Ik heb de onderdelen van het mdf voorzien van een laag witte gesso. Vervolgens heb ik het goed laten drogen.
-
I've painted the mdf parts with white gesso. After that it has to dry well.


Daarna heb ik de kastjes geverfd met twee lagen witte kalkverf. De eerste laag wat dunner zodat de tweede laag dekkend is.
-
After that I've painted the boxes with white chalk paint. The first layer slightly thinner, so that the second layer is colour-covering.


 Ik wilde ook graag aan de slag met de Pronty Crafts mask stencils en heb gekozen voor het triangles stencil 470.531.020. Voor ieder kastje heb ik een andere maat van de driehoeken van het stencil gebruikt.
-
I also wanted to use the Pronty Crafts mask stencils and I chose the triangles stencil 470.531.020. For every box I used a different size of triangle from the stencil. 


 Hoewel het patroon op het stencil kleiner is dan de kastjes kun je dit eenvoudig groter maken. Je kunt het stencil aanleggen aan wat je al gedaan hebt en zo het patroon voortzetten.
-
Although this stencil is smaller than the boxes, you can easily make it bigger. You can line the stencil up to what you stencilled before and repeat the pattern.


Nadat ik de kastjes in elkaar heb gezet heb ik een haakje geplakt op de achterkant.
-
After I assembled the boxes, I put a hook on the back.


Nu kan ik ze aan de muur hangen. Ik heb mijn favoriete hobbyspullen van dit moment er in gezet.
-
Now I can hang them on the wall. I've put my favorite craft supplies in them. 


Ik hoop dat ik jullie weer heb mogen inspireren om ook met de mooie Pronty Crafts spulletjes aan de slag te gaan. Ze zijn een geweldige aanvulling op je hobbykamer!

Hartelijke groet,
-
I hope I've inspired you again to use the beautiful Pronty Crafts products. They’re a great completion to your craft room !

Kind regards,


maandag 16 oktober 2017

Mini book

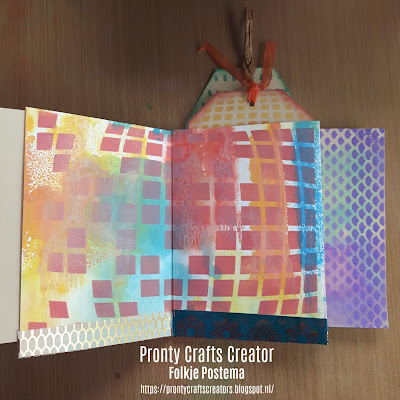
 Vandaag heb ik een boekje gemaakt van een A3 mixed media papier, uiteindelijk wordt het een leuk boekje op A6 formaat. Ik heb de pagina's voor een deel met de Pronty Crafts mask stencils bewerkt, zodat je in het boekje nog mooi kan stempelen, tekenen, schrijven etc.
-
Today I've made a booklet from an A3 mixed media paper, the final format will be A6. I've used the Pronty Crafts mask stencils on some of the pages, that way you can still stamp, draw, write etc. in the booklet.


Het papier heb ik eerst bewerkt met inkt, daarna heb ik het papier gevouwen.
-
I've inked the piece of paper before folding it.


Eerst vouw ik het papier dubbel en vouw ik deze nogmaals horizontaal en verticaal in het midden. Dan knip ik op de middelste vouwlijn tot de eerste vouwlijn die er overdwars op zit.
-
First I've folded the paper in half and then I fold it again in the middle both vertical as horzontal. Then I've made a cut  from the middle vertical line up to the first horizontal line.


Ik vouw de het papier dan zo dat het ingeknipte deel boven zit.
-
I then fold the paper in a way that makes sure the cut is on top and sticks out.


Wat links en rechts van het ingeknipte stuk zit, vouw ik naar buiten en naar beneden.
-
I've folded the parts that are on the left and right side of the cut out and down.


Zo kan ik de pagina's om elkaar heen vouwen en ziet het er zo uit.
-
After that I'm able to fold the pages and this is what it looks like.


De onderkanten van de pagina's zijn open en deze heb ik dus dicht gemaakt met wat washi tape.
-
The bottom of the pages are open and so I've used some washi tape to close them.


Zo blijven er alleen nog twee zijkanten en twee bovenkanten open om kaartjes of labels in te steken.
-
This way only two sides and two tops of the pages remain open for sticking in labels or cards.


De pagina's heb ik bewerkt met de gave Pronty Crafts mask stencils en wat inkt.
-
I created the patterns on the pages by using the aawesome Pronty Crafts mask stencils with ink.


Ik heb bij deze pagina's alleen aan de randen de Pronty Crafts mask stencils gebruikt.
-
On these pages I only used the Pronty Crafts mask stencils around the edges. 


En ook deze pagina's heb ik nog bewerkt met een Pronty Crafts mask stencil.
-
I used a Pronty Crafts mask stencil on these pages as well.


Dit is het eindresultaat. Als laatste heb ik nog wat lint en touw gebruikt en nog een beetje gespetterd met wat witte verf.
-
This is the end result. I've added some ribbons and some string and also some splashes of white paint.


Dit zijn de Pronty Crafts mask stencils die ik heb gebruikt: 

A4 Pattern Triangles 470.803.043
A4 Square waves 470.803.047
A4 470.803.046
A4 "gel"lines 470.803.036
A5 Sticky Stencil 487.012.028
Square with dots 15x15cm, 470.801.045
Mini Square Explos 470.801.042 15x15cm
A5 Square Explosion  470.802.065

Ik hoop dat ik jullie heb weten te inspireren om ook met de prachtige Pronty Crafts mask stencils aan de slag te gaan.

Hartelijke groet,

-

These are the Pronty Crafts mask stencils I've used:

A4 Pattern Triangles 470.803.043
A4 Square waves 470.803.047
A4 470.803.046
A4 "gel"lines 470.803.036
A5 Sticky Stencil 487.012.028
Square with dots 15x15cm, 470.801.045
Mini Square Explos 470.801.042 15x15cm
A5 Square Explosion  470.802.065

I hope I've inspired you to use the beautiful Pronty Crafts mask stencils as well.

Kind regards,


donderdag 12 oktober 2017

Flowers


Vandaag ga ik jullie laten zie hoe leuk je de Pronty Crafts mask stencils kunt gebruiken in combinatie met pastelpoeders.
-
Today I want to show you how you can use the Pronty Crafts mask stencils in combination with pastel powders.

                                        Pattern Triangle                     Diamond Explosion
                                          470.803.043                              470.802.066

                                             Gel Flower                                       Bubbles


                                             470.803.040                                   470.803.035


Voor deze kaart heb ik de bovenstaande Pronty Crafts mask stencils gebruikt.
-


For this card I've used the Pronty Crafts mask stencils as mentioned above.


Ik heb gewerkt op 300 grams aquarelpapier met de pastelpoeders. Eerst verdeel ik de verschillende kleuren, blend en fixeer ik na elke laag.
-
I've used the pastel powders on 300 gramms watercolour paper. I've started by spreading the different colours, blending them and securing each layer with fixative. 

Vervolgens heb ik het Pronty Crafts mask stencil Bubbles 470.803.035 op het blad gelegd en watermerk inkt aangebracht met een sponsje. Daarna haal ik het stencil weer weg en ga ik er overheen met een sponsje met een pastelpoeder in een kleur naar keuze. Ook dit fixeer ik weer.
-
Next I've put the Pronty Crafts mask stencil Bubbles 470.803.035 on the paper and used a sponge with watermark ink to transfer the pattern onto the background. I then remove the mask stencil from the paper and add some pastel powder in a colour of choice. Afterwards I use the fixative again for securing the powders in place.


Het ziet er dan zo uit.
-
This is what it looks like at this moment.


Vervolgens heb ik deze stappen nogmaals herhaald met behulp van een aantal andere prachtige Pronty Crafts mask stencils.
-
I've repeated these steps with a couple of other beautiful Pronty Crafts mask stencils.


Nu is de achtergrond zo goed als klaar en gebruik ik een stempel die ik vervolgens inkleur met aquarelpotloden.
-
The background is almost done and I now stamp an image which I'm going to colour with some watercolour pencils.


Na nog wat kleine accenten te hebben aangebracht met stempeltjes, is mijn kaart klaar. Ik hoop dat ik jullie heb mogen inspireren om ook met de toffe Pronty Crafts mask stencils aan de slag te gaan.

Hartelijke groet,
-
After adding a few more stamped accents my card is finished. I hope I've inspired you to use the awesome Pronty Crafts mask stencils as well.

Kind regards,