Pagina's

zondag 20 mei 2018

Pronty stencils op de GelliPlate.

Hallo allemaal,

Hello everyone

Pronty heeft veel stencils in het assortiment. Ik werk graag met een GelliPlate en stencils.
Vandaag laat ik jullie zien hoe ik dat doe.

Pronty has a lot of stencils in their product range. I love to work with a GelliPlate and stencils.
Today I want to show you how I do that.


 Wat heb je nodig:

What do you need:


Ronde GelliPlate
Brayer
Stempelinkt
kleurtje distressinkt
Aquarelpotlood
Stencil: Gel Flower 400.803.040
waterpenseel

Round GelliPlate
Brayer
Stampink
A color distressink
Watercolorpencil
Stencil: Gel Flower 400.803.040
Waterbrush


Leg je GelliPlate op een stempelblok. Doe je inkt erop en rol met je brayer tot je een egale kleur hebt gekregen

Put your Gelliplate on a acryllicblock.
Put your Ink on it and roll this out with the brayer until you have a smooth color.


Leg je stencil op je GelliPlate en rol nog een paar keer met je brayer over het stencil.
Haal je stencil eraf.

Lay the stencil on the GelliPlate and roll a softly a few times over the stencil.
Then take the stencil of.


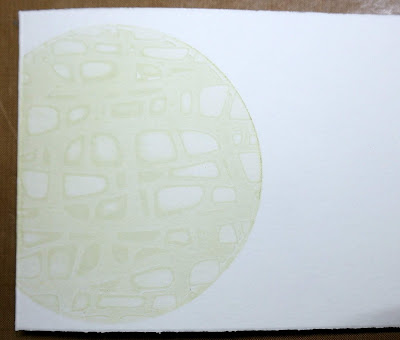
Pak nu je dubbele kaart en leg die plat en helemaal open op je craftsheet. Neem een papiertje en dek het stuk af (achterkant van je kaart) waar je de afdruk niet wilt hebben. Ik druk namelijk niet het hele rondje af.

Now take your double card and lay him flat on the crafsheet. Take a paper and put that over the part where you don't want to have a print. This because I print this time only a part of the GelliPlate.


Dan ziet je afdruk er zo uit.

The print looks like this.


Met een aquarelpotlood in bijpassende kleur, maak ik hier en daar wat accenten. Die werk ik uit met een vochtige waterpenseel.

With a watercolorpencil in a matching color you bring some accents on the print. Work the color out with the waterbrush.


Nu kan je de stempels gaan plaatsen.

Now you can place your stamps.


En natuurlijk ook een tekst.
Je kaart is klaar.
Veel succes met het maken van jullie eigen creatie. Laat hem zien op Facebook. Dat vinden we erg leuk.

And of course a quote.
The card is finished.
Good luck with making your own creations. Please show them on our FaceBookPage. We like to see them.


donderdag 17 mei 2018

Paradijsvogels/ Birds of paradise

Hallo en welkom,

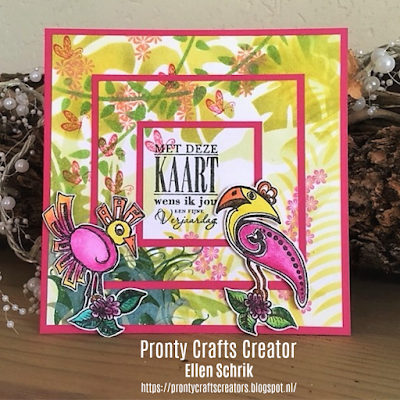
Voor vandaag heb ik een kaart  in tropische sferen voor jullie. Ik laat jullie graag stap voor stap zien hoe hij is gemaakt.
-
Hello and welcome,


Today I want to show you a card with a tropical setting. And I'm happy to show you step by step how I made it.


Begin met drie vierkantjes: 13 x 13 cm, 9 x 9 cm en 5 x 5 cm. Bevestig stukjes masking tape (dat je in drieën hebt gevouwen met de plakzijde buiten) op de achterzijde zodat ze niet verschuiven. Leg ze zoals afgebeeld hieronder.
-
Start with three squares: 13 x 13 cm, 9 x 9 cm and 5 x 5 cm. Add pieces of folded masking tape on the back to prevent moving. Lay them as shown below.


Neem verschillende kleuren groene inkt en spons door je stencils de diverse bladeren op je kaart. De grote bladeren doe je met lichte inkt, de kleinere met donkerder tinten.
-
Choose some green inks and sponge the various leaves through the stencils onto your card. The large leaves with light ink, the smaller ones with darker greens.


Je kunt ook lichte en donkere tinten binnen één blad gebruiken, zoals hieronder.
-
You can also use lighter and darker tones in one leaf, as shown below.


Gebruik de verschillende stencils om zo een tropisch sfeertje te creëren.
-
Use the various stencils from this set to create a tropical setting.


Stempel in rood, oranje en roze de kleine bloemetjes en vlindertjes.
-
Add little stamped flowers and butterflies in red, orange and pink.


Plak de verschillende vierkantjes elk op een eigen roze ondergrondje. Het randje is 2 tot 3 mm. Voeg tropische vogels en een tekstje toe, en klaar is je tropische kaart!
-
Adhere each little square to its own pink mat. The border is 2-3 mm. Add some tropical birds and a sentiment and your tropical card is ready!


Deze kaart is gemaakt met de tropische leafs set 470.850.005
-
This card is made with the tropical leafs set 470.850.005
Ga je ook aan de slag met Pronty producten? Op onze facebook-pagina kun je jouw creatie laten zien, we zijn erg benieuwd!
-
What are you going to make wiht the Pronty stencils? On our Facebook page you can show us your creation, we look forward to seeing your artwork!

Lieve groetjes,
-
Kind regards


maandag 14 mei 2018

Layered stencils


Hallo allemaal,
-
Hello everyone,

Vandaag heb ik een kaart voor jullie gemaakt met de layered stencils.
-
Today I've made a card with the layered stencils.


Met het eerste stencil heb ik de groene peeled paint Distress Ink aangebracht met een vinger dabber.

-
I applied peeled paint Distress Ink with the first stencil and a finger dabber.


Voor de tweede stencil heb ik carved pumpkin distress ink gebruikt.
-
For stencil number two, which is the second layer on the card, I used carved pumpkin distress ink.


Voor het derde en laatste stencil heb ik squeezed limonade gebruikt.
-
I used squeezed lemonade for the third and final stencil.


Voor de cactus heb ik een andere stencil gebruikt, deze met distress ingekleurd en uitgeknipt
-
For the cactus, I've used another stencil en cut this out.


Dit zijn de producten van Pronty dat ik heb gebruikt
-

Layered stencls maroccan pattern 470.850.004 

Llama en cactus stencil 470.268.121


This are the products that Ive used for the card
-

layered stencils, maroccan pattern 470.850.004
Llama and cactus stencil 470.268.121


Ik heb nog andere kaarten gemaakt met de layered stencils. Er zijn nog andere designs die je kan vinden bij Pronty, kaart van de lama's is gemaakt met de layered stencils mexican pattern 470.850.003
-
For the other card with the lama's, Ive used layered stencils mexican pattern 470.850.003


Nog een fijne dag,
groetjes Chantal
-

Have a nice day,
Kind regards Chantal


vrijdag 11 mei 2018

Cute as a cactus

Hallo allemaal,
-
Hello Everyone,

Vandaag ben ik met de cactussen aan de slag gegaan, ik heb mooie vrolijke kleurtjes gebruikt, die mooi bij het heerlijk zomers weertje van de afgelopen dagen past.

-

Today I've worked with the cacti, I've used some bright colours that match the beautiful weather of the last couple of days.

De kleine cactussen zijn van mdf en de grote van hout, als eerste heb ik alles in de Gesso gezet.

-

The small cacti are made of mdf and the large one is made of wood. First I applied Gesso on all of them.

De grote cactus heb ik bewerkt met structuur pasta en met een palet mes daar een groffe structuur op aangebracht. Ik heb beide kanten met de pasta bewerkt.

-

I applied texture paste on the large cactus and I used a palette knife to apply the rough texture.


De potjes van de kleine cactussen heb ik een mooi vrolijk kleurtje gegeven, de oranje heb ik later toch ook roze gemaakt omdat die kleur een beetje tegenviel. De onderdeeltjes klik je heel gemakkelijk in elkaar en zo staan ze mooi stevig

-

I painted the pots in bright colours, eventually I changed the orange to pink, because I didn't like the orange colour. The parts click together very easily and are very sturdy. 


Om een mooie strakke lijn te krijgen heb ik de gele tape gebruikt, dit werkt ideaal en neemt geen verf mee als je het weer verwijderd.

-

To get a crisp line, I used yellow tape. This works very good and doesn't take of the paint when you remove it.


De cactussen zijn inmiddels groen geverfd en de pot van de grote cactus heeft ook een mooi kleurtje gekregen. De potjes heb ik nog een beetje opgepimpt met een stencil.

-

The cacti have been painted green and teh pot of the large cactus has also been painted in a bright colour. I used a stencil on the pots.


Nog even een foto van de memorol/maskeer tape. Ik gebruik dit erg veel, vooral op papier is dit erg handig, omdat het je papier niet beschadigd. 

Ik heb de volgende producten van Pronty gebruikt, mdf cactus 460.432.100  mdf cactus 460.432.110  mdf cactus 460.432.120  cactus groot 422.902.005 en het A5 stencil 495.020.002.

Ik hoop dat ik jullie een beetje heb kunnen inspireren en dat jullie ook zin hebben gekregen om met de mooi producten van Pronty aan de slag te gaan.

Hartelijke groet,

-

Lastly a photo of the tape I used. I use this a lot, mostly on paper like this, because it doesn't damage the paper.

I used the following products, mdf cactus 460.432.100, mdf cactus 460.432.110, mdf cactus 460.432.120, cactus large 422.902.005 and the A5 stencil 495.020.002.

I hope I've been able to inspire you the start working with the beautiful products from Pronty.

Kind regards,