Pagina's

vrijdag 31 augustus 2018

Classy Lady by Julia Woning


Vandaag laat ik je zien hoe ik met mijn stencil van Pronty Crafts by Julia Woning de Classy Lady schilder met Ara Artist acrylverf. Ik begin om mijn dame over te nemen met grafietpotloid. Ik gebruik mijn stencil als mal.

Today I will show you how you can use the Classy Lady stencil from Pronty Crafts by Julia Woning. I worked with the Ara Artist Acrylics. I wil start with a pencil line. I will use the stencil as a template/ mold.


Dan pak ik de basis kleuren wit, geel, rood en blauw van Ara artist acrylverf. Ik meng de juiste kleuren voor mijn Classy Lady.

Then I will get the basic colors of the Ara Artist Acrylics. White, yellow, red and blue and I will mix the colors for my Classy Lady.


Als laatste leg ik nogmaals het stencil over de gedroogde schildering en nu met zwarye verf en een blendingtooltje breng ik de afbeelding over de geschilderde dame.

At last I put my stencil on top of the painted Lady en bring black paint on with a blending tool. 


Bekijk de video hoe ik het heb gedaan. Veel kijk plezier en tot een volgende keer.

Julia Woning

Whatch the video how I did it. Lots of fun watching till next time.

Julia Woning


maandag 27 augustus 2018

Wilde Dieren kaartjes

Hallo Iedereen, 
vandaag maak ik weer 2 kaartjes met een nieuwe stempel en een stencil.


Hello everyone, 
today I will be making 2 cards with a new foam stamp and a stencil


laten we beginnen, 
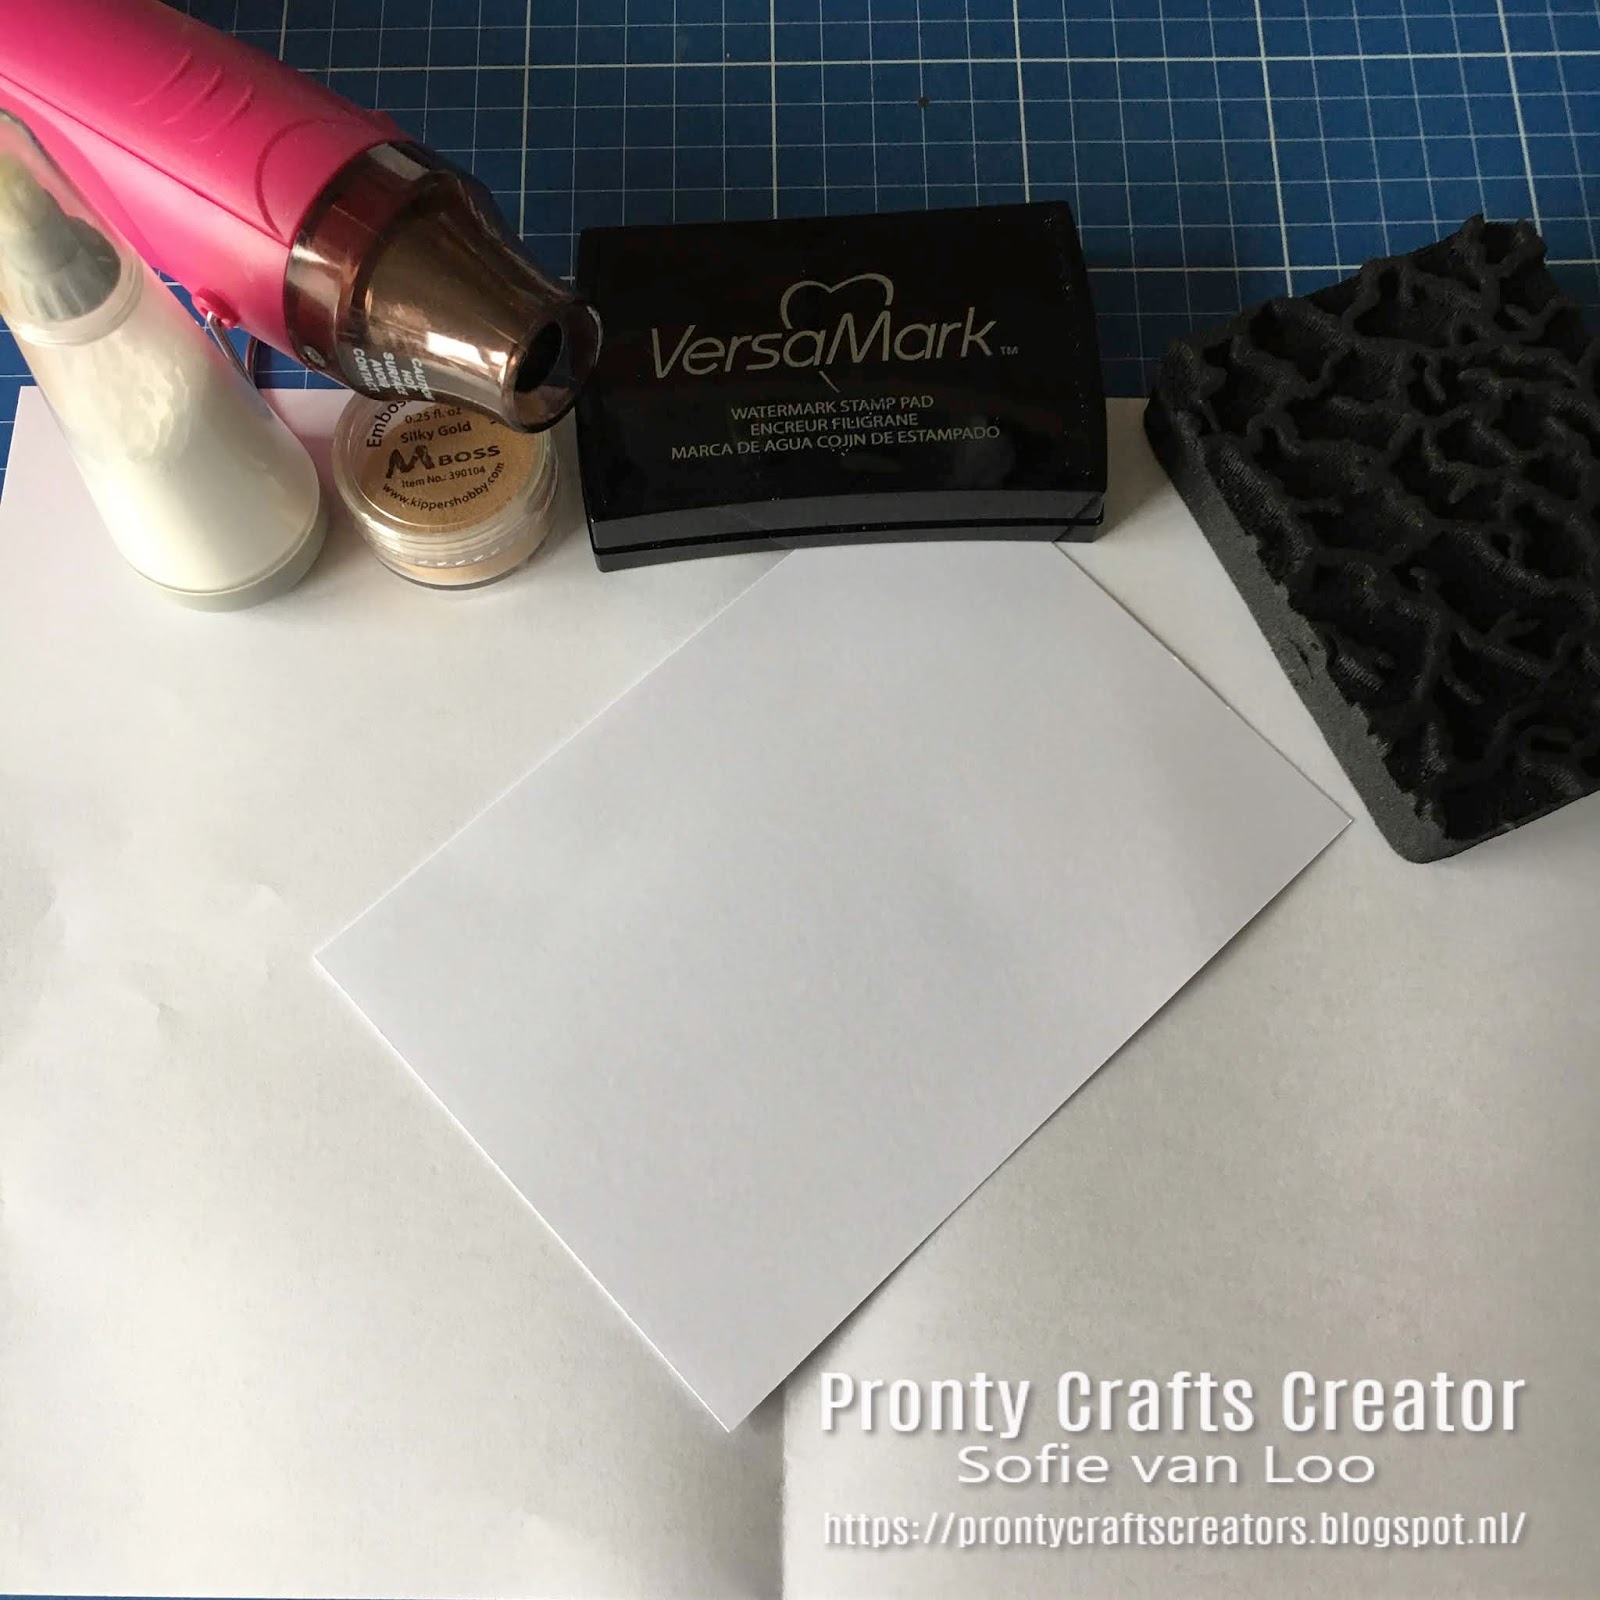
voor de bovenste kaart met de zebra heb ik een kaart genomen,
 deze bestempeld met Versamark met de nieuwe Dry Ground foam stempel (494.001.012).
  Vervolgens heb ik er gouden embossingpoeder opgestrooid, 
en met de heattool laten smelten


Let's get started.
For the first card with the zebra I've started with a white cardfront,
I've stamped a pattern with the new Dry Ground Foam Stamp (494.001.012),
sprinkled on some gold embossing powder, 
and heated it with my heattool


Met een vingersponsje heb ik de witte achtergrond voorzien van wat distress inkt in de kleur Old Paper.
Dan heb ik een leuke stempel uitgezocht.  
Ik vond het dieren thema hier wel bij passen.


With a finger dauber I've blended some distress ink in the colour Old Paper
Then I went in my stash to find a nice stamp.
I found that the animal theme was really appropriate


Op zoek naar een leuke quote om erbij te doen, en
dit is het eerste kaartje geworden, 
ben er best tevreden over


On the hunt for a quote for the card, 
this is what I came up with.
I'm really happy with this first card


Op naar het tweede kaartje... 
 In principe is dit ongeveer hetzelfde,
 enkel heb ik een stencil (Grunge 1 494.001.012) gebruikt voor de achtergrond, 
maar ook met versamark en embossingpoeder bewerkt.
  Leuke stempel uitgezocht en toffe quote,
en zo is het tweede kaartje ontstaan


On to the second card for today...
It's almost the same procedure, but instead of a stamp I've used a stencil this time.  I have used the Grunge 1 (470.801.053) stencil
I've found a great stamp and a cool quote,
and that is the second card done


Hopelijk vonden jullie het weer net zo leuk als ik het had toen ik deze kaarten gemaakt heb. 
Ik ga er een winactie van maken, namelijk deze 2 kaarten!!
 Laat een leuk berichtje achter en vertel me daarin wat jullie zo fijn vinden aan de herfst die er zit aan te komen. 
De winnaar ontvangt deze leuke kaarten in de brievenbus.
Je kan meedoen tot en met 27 september, en op 28 september kies ik de winnaar.
Veel geluk iedereen :-)
Ik ga even verder aftellen naar mijn vakantie nu..!


I hoped you liked this blogpost
I am doing a Giveaway of these 2 cards.
Leave a message on this blogpost about what you like about the upcoming season 'fall'/autumn'
The winner receives these cards in the mail.
You can enter the contest until the 27th of September, and I will choose a winner on the 28th.
Lots of luck to everybody :-)
Now my countdown starts to my holiday...!


donderdag 23 augustus 2018

Lovely Lady Stencil

Stencil als mal

Mijn stencils die ik voor Pronty Crafts heb ontworpen zijn leuk, al zeg ik het zelf ;-) Vandaag laat ik je zien dat je ze kunt gebruiken als mal. Ik bedoel i.p.v. het stencil met verf een afdruk te maken. Gebruik ik het stencil als mal en teken ik met een grafiet potlood alle vakjes. Let wel op dat je consequent blijft alle vormen aan de buitenkant tekenen of binnenkant niet willekeurig en niet het hele vakje omlijnen .

Use a stencil as a template/mold

The stencils I made for Pronty Crafts are fun, even if I say so myself ;-) Today I show you that you can also use them as a template. I mean to make a drawing instead of a print with the stencil with paint. I use the stencil as a template/mold and draw with a graphite pencil lines. Please note that you consistently continue to draw all shapes on the outside or inside.


Als ik tevreden ben met mijn tekening dan gum ik het heel licht uit, maar nog net zodat ik het kan zien. Dan begin ik met de Derwent Coloursoft potloden de tekening in te kleuren.
 When I am satisfied with my drawing, I erase it very lightly, but just so that I can see it. Then I start coloring the drawing with the Derwent Coloursoft pencils.

 Ik krijg vaak de vraag: Hoe krijg je huidskleur? Belangrijk sowieso is dat je alke vlakken maak niet uit of het huidskleur is of een andere kleur. Dat je altijd 2 of meer kleuren gebruikt. Want dat geeft veel meer kleur, contrast en uitstraling. 
Bij huids kleur werk ik mininmaal met twee kleuren, een oker tint en een rose tint. Welke maakt niet zoveel uit kijk maar welke je hebt en probeer gewoon. Laag over laag lichte kleuren aanbrengen en beginnen met oker geel. Als je de kleur mooi vindt en je wilt diepte creëren door schaduw aan te brengen dan is een paarse kleur mooi om te gebruiken. Ook weer heel dun aanbrengen laag over laag. Met potlood kleuren vergt een maal geduld en veel tijd.

 I often get the question: How do you get skin color? It is important that you always use 2 or more colors. Because that gives much more color, contrast and makes you work better. For skin color I work at least with two colors, an ocher shade and a pink shade. Which one does not matter but just use what you have and try. Apply layer on layer and start with over light colors. First yellow ocher then the pink color. If you like the color and you want to create depth by applying shade, then a purple color is nice to use. Again apply very thin layer over layer. Using pencil colors requires patience and a lot of time.


Dan vind ik het mooi om in deze tekeng te gaan blenden. Je ziet dat de potloodpigmenten reageren met terpentibe en erontstaat een prachte kleur zowel in de kleding als in het haar.

Then I would love to blend this drawing. You see that the pencil pigments react with turpentine and a beautiful color apears in both clothing and hair when you blend with terpentine.


In De film kun je zien hoe ik het hebt gedaan. Van tekenen met het stencil, huidskleur opbouwen en blenden met terpentine.
Probeer het maar eens je stencil gebruiken als mal. Heel veel kleurplezier met 
de Lovely Ladies van 

Pronty Crafts by Julia Woning.

In The movie you can see how I did it. From drawing with the stencil, skin color and blending with turpentine.Just try using your stencil as a template. Have a lot of fun coloring the Lovely Ladies from Pronty Crafts by Julia Woning


vrijdag 17 augustus 2018

Pronty Crafts by Julia Woning


Pronty Crafts by Julia Woning

Voor deze nieuwe lijn van Pronty Crafts by Julia Woning kun je al een pre-order plaatsen bij je hobbywinkel. De levering zal eind augustus begin september zijn. Vandaag laat ik je een impressie zien wat je met de birds by Julia en flowers by Julia kunt maken. De 23ste al een nieuw Tutorial filmpje hoe Julia met de stencils werk. Nog even geduld, maar binnenkort kun jij zelf aan de slag met deze ontwerpen van Pronty Crafts by Julia Woning.


For this new line of Pronty Crafts by Julia Woning you can already place a pre-order at your hobby shop. Delivery will be at the end of August in early September (in the Netherlands). Today I show you an impression of what you can do with the birds by Julia and flowers by Julia. On the 23th a Tutorial video about how Julia works with the stencils. Just have a little patience soon you can get started with these designs by Pronty Crafts by Julia Woning.


Pronty Crafts by Julia Woning gets its own design team: "De Dames van Julia = The Ladies of Julia" they will make Dutch posts. Julia will regularly show projects what you can make with the stencils and the foam stamps in Dutch and English. You can see this on the Pronty Crafts and friends facebook page and monthly on this Blog.


Pronty Crafts by Julia Woning krijgt een eigen design team: "De Dames van Julia" Julia zal regelmatig projecten laten zien wat je zoal kunt maken met de stencils en de foam stempels. Dit kun je op de Pronty Crafts and friends facebook pagina zien. 
"De Dames van Julia" het design team, maken ieder op haar niveau en in hun eigen stijl mooie posten met de Pronty Crafts by Julia Woning lijn. Wij hopen dat jullie geinspireerd worden en vooral veel plezier en creativiteit krijgen met deze nieuwe lijn. 

Pronty Crafts by Julia Woning DT 
"De Dames van Julia":


DAISY VERBEEK coloring & crafts by Daisy

Creatief bezig zijn is altijd een rode draad in mijn leven geweest. We herkennen het allemaal...de passie voor onze hobby's & het verzamelen van mooie materialen. Gelukkig is het een gezonde verslaving & ik hou mij voornamelijk bezig met kleuren en mixed media. Deze 2 combineer ik graag in mijn projecten. Toen ik gevraagd werd voor het design team hoefde ik daar niet lang over na te denken, want ik hou wel van een creatieve uitdaging! 
Ik kan niet wachten om aan de slag te gaan en jullie te inspireren met de nieuwe lijn 
stencils & foamstempels 
van Pronty Crafts by Julia Woning ♡

ELLEN STOLK de enige echte Julia Woning fan groep

Ik vind het leuk om creatief bezig te zijn met verschillende materialen. Naast mijn werk en het wandelen met mijn hond Puk ben ik dagelijks bezig met kleuren. Ook ben ik de beheerder van de facebook fan groep van Julia. Daar kan iedereen zijn kleur werk laten zien die ze gemaakt hebben in de kleurboeken van Julia en natuurlijk straks met de pronty Crafts by Julia Woning lijn projecten ;-) ook organiseer ik daar regelmatig kleurmaatjes opdrachten dus een actieve groep voor echte juliakleur fans.

CORDINE VAN DER TOUW Copic Teacher, Colourstock design team

Ik ben mijn hele leven al wel creatief bezig geweest met kleurpotloden ed. maar vanaf 2001 nam het scrapbooken zijn entree. In 2009 heb ik de Copic Marker gevonden. Vanaf april 2013 ben ik Copic teacher via Colourstock Benelux en geef les via het ECCP, European Copic Colouring Program. Tevens geef ik diverse workshops en demonstraties.


dinsdag 14 augustus 2018

A jar full of sunshine

Hallo en welkom,

We hebben een hele warme periode achter de rug en ik heb geprobeerd er een beetje van te vangen op onderstaande kaart. Hiervoor gebruikte ik een van de nieuwste Pronty-stencils:
Grunge2, 470.802.073
 
-
 
Hello and welcome,
A very hot period lies behind us and I tried to capture al little bit on the card below. I used one of the latest Pronty-stencils:
Grunge2, 470.802.073.


Daar gaan we:

Begin met het vastmaken van je stencil aan de kaart. Ik gebruik meestal schilderstape. Hier is mijn kaart net zo groot als het stencil en kon ik de tape om de kaart vouwen.
Neem een beetje gesso op je craftsheet, smeer dit een klein beetje uit en spons het door het stencil op de kaart. Laat goed drogen. Ik gebruikte 185 gr aquarelpapier om op te werken.
 
-
 
Here we go:

Start with taping the stencil to your card. I use painters tape for this. Here my card has the same size as the stencil so the tape is around the card and adhered to the back.
Then take a little gesso and sponge a thin layer through the stencil and let dry. I used 185 gr watercolour paper to work on.


Zodra de gesso droog is, spons je met drie kleuren distress inkt over de kaart. De gesso werkt als een resist en de stralen nemen de inkt niet op. Eventueel kun je met een babydoekje of licht vochtige keukenpapiertje de extra inkt afvegen van de stralen.
 
-
 
When the gesso is dry, sponge with three colours  of distress inkt onto your card. The gesso acts as a resist and the rays will remain white. If necessary you can use a baby wipe or damp paper towel to remove acces ink from the rays.


Stempel in dezelfde kleuren een achtergrondtekst hier en daar op je kaart. Gebruik de tweede afdruk, zodat hij niet te prominent aanwezig is, maar net een beetje effect geeft. Dan stempel je de pot en de tekst op een apart stukje papier en knip het uit. Kleur de pot met een gele fluor-marker en plak de onderdelen op. Snijd de kaart op maat en plak er bijpassend cardstock achter.
 
-
 
Stamp with the same colours a background text on the card. Use the second impression, so that it is not too visible, just enough to give some effect. Then stamp your jar and the sentiment on a separate piece of paper and cut out. Colour the jar with a yellow highlight marker and adhere all parts to the card.
Cut the card to size and adhere to matching cardstock.


De stralen stoppen vóór de rand van de kaart (zie hierboven). Ik heb daarom de kaart zó op maat gesneden dat de stralen doorlopen naar de randen. Je kunt duidelijk het verschil zien hierboven en het eindresultaat hieronder.
 
-
 
The rays seem to stop before the edges of the card (see above). Therefore I cut the card to size so the rays appear to go off the card. You can see clearly the difference on the card above and the end result below.

Ik hou van het subtiele effect van een gesso-resist met lichte kleuren inkt. Het voelt licht en zomers. Voor een meer dramatisch effect kun je de inkt zwaarder opbrengen.

Ik hoop dat je mijn tutorial leuk vond. Wist je dat je jouw creaties kunt posten op onze Facebook-pagina? We vinden het erg leuk om te zien wat je hebt gemaakt met Pronty-producten!

Lieve groetjes,

-
 
I really love the effect of the gesso resist with light ink colours. It gives a light and summery feel. For a more dramatic effect you can apply more ink.

I hope you enjoyed my little tutorial. And did you know you can post your makes on our Facebook page? We love to see what you've created with the Pronty producs!

Kind regards,


zaterdag 11 augustus 2018

Eerste pagina Art Journal


 Hallo allemaal, vandaag heb ik een pagina in mijn nieuwe Art Journal gemaakt. Ik heb hier verschillende foam stempels, stencils en acrylverf voor gebruikt.

-

Hello everyone, today I made a page in my new Art Journal. I used various foam stamps, stencils and acrylic paint.


Als eerste had ik op mijn papier aquarel verf in drie kleuren aangebracht, maar ik ben vergeten daar een foto van te maken. Ik heb met een vingerdabber acrylverf op de stempel aangebracht, ik vind dit fijn werken en de verf gaat dan niet tussen de spiraal zitten zodat je afdruk mooi strak wordt.

-

First I applied three different colours of aquarelle paint, but I forgot to take a picture of that. I used finger daubers to apply acrylic paint to the stamp, I find it pleasant to work with, and the paint doesn't get stuck between the spirals.


Op de linkerkant van de pagina heb ik een aantal keren de spiraal gestempeld.

-

I used the spiral stamp several times on the left side of the page.


Op de Trunk stempel heb ik de acrylverf op dezelfde manier aangebracht.

-

I applied the acrylic paint the same way on the Trunk stamp.


Aan de rechterkant van de pagina heb ik afdrukken met de Trunk stempel gemaakt.

-

On the right side of the page I used the Trunk stamp.


Ik heb de spiralen links afgeplakt, zodat het niet overlapt, en nog meer afdrukken gemaakt met de Spiraal stempel.

-

I taped of the spirals on the left side, so they don't overlap, and made some more stamps with the Spiral stamp. 


De Fossil stempel ga ik ook weer op dezelfde manier gebruiken, maar nu met gele acrylverf.

-

I'll be using the Fossil stamp in the same way, but with yellow paint this time.


Ook hier ben ik weer gaan afplakken en op deze manier heb ik de pagina vol gestempeld.

-

I used this stamp over the whole page, and taped of the parts I didn't want it on.


Dan is dit het resultaat na het stempelen, ik heb rood, oranje en geel gebruikt.

-

This is the result after stamping, I used red, oranje and yellow.


Met het A4 travel quotes 470.529.008 heb ik de tekst gemaakt, deze heb ik met zwarte verf en een vinger dabber aangebracht.

-

I used the A4 travel quotes 470.529.008 for the text, I applied it using balck acrylic paint and a finger dauber.


Als laatste de vogels, voetstappen en nog wat tekst toegevoegd. De randen heb ik lichtjes met zwarte verf bewerkt. 

Ik heb de volgende stencils gebruikt, A4 travel quotes 470.529.008, A4 stencil travel quotes 1 470.529.009 en de foam stempels Fossil 494.001.004, Trunk 494.001.003 en de spiral 494.001.011, de laatste stempel is van de nieuwste collectie

Met vriendelijke groeten,

-

Lastly I applied the birds, footsteps and some more words. I also applied a little bit of black paint on the edges.

I used the followibg stencils, A4 travel quotes 470.529.008, A4 stencil travel quotes 1 470.529.009 and the foam stamps Fossil 494.001.004, Trunk 494.001.003 en Spiral 494.001.011, the last stamp is from the new collection.

Kind regards,


woensdag 8 augustus 2018

Fotolijstje

Hallo allemaal/Hello everyone

Vandaag ben ik met een fotolijstje van Pronty bezig gegaan.
Today, I used a Pronty photo frame.


De materialen die ik heb gebruikt zijn:
The materials I used:

Fotolijstje/Photo frame Pronty  (461.333.000)
Bullet Journal Stencil Edges 1 (470.851.005)
Dutch Doobadoo - Gesso White
Docrafts Acrylverf - Lush Pink, Wild Violet, Amethyst
Stickles - Lavender
Zwarte pen en Posca marker/Black pen and Posca Marker

Dit zijn de onderdelen van het lijstje.
These are the parts of the frame.


Ik heb het lijstje eerst een laag gesso gegeven.

First I painted the frame with gesso.


Daarna met een sponsje en 3 kleuren verf het lijstje geverfd.

After that, I painted the frame with a sponge and 3 colours of paint.


Toen met dezelfde kleuren en bubbeltjes plastic meer verf aangebracht.

Then I used the same colours and bubble warp and applied more paint.


Met een Bullet Journal stencil en een zwarte pen figuurtjes getekend
op het lijstje en die ingekleurd met de Posca marker.

With a Bullet Journal stencil and a black pen,
I traced some patterns on the frame and
coloured them with a black Posca marker.


Met Stickles een druppel glitter op de vierkantjes gedaan.

With Stickles I put little drops of glitter on the little squares.


Een leuke vakantiefoto of een mooie spreuk,
alles staat leuk in dit vrolijke lijstje!

A fun holiday picture or a nice quote,
everything looks good in this cheerful frame!


Tot de volgende keer!

See you next time!

Groetjes, Margriet