Pagina's

zaterdag 26 augustus 2017

Mixed media kaart

Hallo allemaal, 
Vandaag mag ik weer een bijdrage leveren voor het Pronty Crafts Creators blog. 
-
  Hello everybody,
 Today it's my turn again to show my creations on the Pronty Crafts Creators blog.


Ik laat jullie zien hoe je met behulp van een tof Pronty Crafts stencil een mooie kaart maakt.
-
I will show you how to make a beautiful card with the help of one of the awesome Pronty Crafts mask stencils.


De achtergrond van de kaart heb ik gemaakt met structuurpasta en het Pronty Crafts stencil Tille pattern flowers 470.529.007. De kleuren op deze achtergrond heb ik aangebracht met verschillende spray's.
-
  I made the background by using the Pronty Crafts mask stencil Tille pattern flowers 470.529.007 in combination with some modelling paste. I've added some colour to the background by using sprays.


 Vervolgens heb ik verschillende stempels gebruikt en deze met zwarte inkt gestempeld op de achtergrond. 
-
After drying, I've used some black ink to stamp several different stamps on the background.


 Daarna heb ik een roos gestempeld en ingekleurd. Deze heb ik vervolgens uitgeknipt en op de achtergrond geplakt.
-
I've then stamped and coloured a rose. Next step is to cut out the coloured rose and stick it on the background.


Als laatste heb ik nog een tekst toegevoegd en heb ik de achtergrond op zwart cardstock gemat.
-
Last but not least, I've added a sentiment and glued the background on to a slightly bigger piece of black cardstock.


Dit zijn nog een aantal kaarten die ik met dezelfde techniek gemaakt heb. Ik hoop dat ik jullie weer wat inspiratie heb gegeven om ook met dit mooie Pronty Crafts stencil aan de slag te gaan. 

Hartelijke groet,
-
These are a few more cards I've made by using the same technique. I hope I've been able to inspire you to use this beautiful Pronty Crafts mask stencil as well.

Kind regards,


vrijdag 18 augustus 2017

Quick cards

Vandaag laat ik je zien hoe je snel een kleurrijke en stijlvolle kaart kunt maken.
-
Today I want to show you how you can quickly make a colourful and stylish card.


Begin met het op maat snijden van je papier: de basiskaart, een topkaart en een matje voor onder de topkaart. En scheur een stuk printerpapier in tweeën.
-
Start with cutting the paper: the base card, the top layer and a mat for the top layer. And tear a piece of printer paper in half.


Plak de topkaart met schilderstape tijdelijk op je Pronty Crafts craft sheet en plak daarna je gescheurde helften er over. Nu kun je gaan sponsen tussen je gescheurde helften.
-
Adhere your top card temporarily on your Pronty Crafts craft sheet with masking tape and adhere the torn pieces on top. Now you can sponge the part between the torn papers.


Nu kun je los gaan met je Pronty Crafts mask stencils. Spons met dezelfde kleuren over gelijke kleuren (blauw op blauw, roze op roze) en laat het hier en daar overlappen over een andere kleur. Ook de stencils kun je hier en daar overlappen.
-
Now it's time to go wild with your Pronty Crafts mask stencils. Sponge with the same colours on the same places (blue on blue, pink on pink) and try to overlap for some great new colours. You can also let the stencils overlap here and there.


Neem dan je gescheurde papier af, stempel een afbeelding en de tekst. Neem je "matje" en spons de rand in een van de gebruikte kleuren en plak alles op je basiskaart.
-
When ready, take off your torn paper, stamp on an image and sentiment. Take the "mat", sponge the edges in one of the used colours and adhere everything to your base card.


Ik gebruikte de volgende Pronty Crafts mask stencils:

470.803.035 "gel" bubble
470.801.040 ornament flowers
470.801.039 tree trunk
-
I used the following Pronty Crafts mask stencils:

470.803.035 "gel" bubble
470.801.040 ornament flowers
470.801.039 tree trunk


Bovenstaande kaarten zijn allemaal gemaakt met dezelfde techniek.
Bedankt voor je bezoekje. Ik hoop dat je mijn tutorial handig vindt en dat ik je geïnspireerd heb voor het maken van een stapeltje snel-klaar kaarten met Pronty Crafts mask stencils.

 Hartelijke groet,
-
The cards above are all made by using the same technique.
Thanks for stopping by. I hope you like my tutorial and I hope I inspired you to make a bunch of these quick cards with Pronty Crafts mask stencils.

Kind regards,


maandag 14 augustus 2017

Art Journal Flowers

Vandaag heb ik voor jullie een foto tutorial van een Art Journal spread.
-
Today I've made a photo tutorial of an Art Journal spread for you.


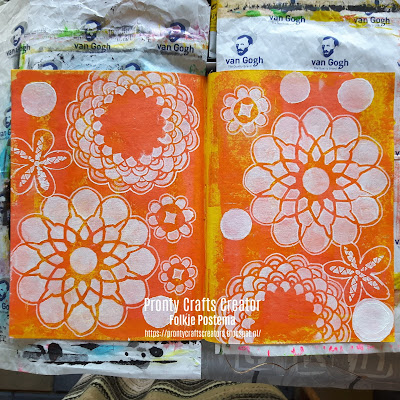
Ik ben in de weer geweest met acrylverf en de Pronty Crafts stencils "gel" Flower 470.803.040, "gel" Lines 470.803.036 en "gel" Circle 470.803.041. Dit zijn allemaal A4 formaat stencils.
-
 I've been working with acrylic paint and the Pronty Crafts mask stencils "gel" Flower 470.803.040, "gel" Lines 470.803.036 and "gel" Circle 470.803.041. They're all the size of A4.
  

Op de beide pagina's heb ik oranje en gele verf aangebracht met een brayer.
-
I've applied orange and yellow paint on both pages by using a brayer.


Hierna heb ik met witte acrylverf en de stencils verschillende motieven aangebracht, met een witte posca marker heb ik de randen om de bloemen heen getekend.
-
After that I added several patterns with the mask stencils and some white acrylic paint. I then used a white posca marker to draw some lines around the flowers.


In de cirkels en bloemen heb ik wat kleur aangebracht met gelato's, posca's en aquarelpotloden. Als laatste heb ik met het Pronty Crafts stencil Lines nog wat accenten aangebracht met paarse verf.
-
I coloured the circles and flowers with gelatos, poscas and watercolour pencils. Last, but not least, I've used the Pronty Crafts mask stencil Lines and some purple paint for some accents.


Dit is dan het eindresultaat van mijn art journal spread. Als finishing touch heb ik nog wat witte en zwarte spetters aangebracht. Hopelijk heb ik jullie kunnen inspireren om ook de gave Pronty Crafts mask stencils te gaan gebruiken voor je art journal.

Hartelijke Groet,
-
This is the end result of my art journal spread. As a finishing touch I've added some white and black splatters of paint. I hope I've inspired you to use the awesome Pronty Crafts mask stencils for your art journaling as well.

Kind Regards,


donderdag 10 augustus 2017

Friends for Life

Hallo allemaal,
Terug van vakantie en wat staat er op me te wachten? Een groot pakket met heel veel leuk materiaal van Pronty Crafts. Hoe leuk thuiskomen is dat?! Het was dus moeilijk kiezen waar nu mee te beginnen, maar vandaag wil ik jullie laten zien hoe je de Pronty Crafts mask stencils ook op een gelliplate kunt gebruiken. Het maakt niet uit hoe groot het stencil is, want je kunt er ook gewoon een gedeelte van gebruiken.
Ik neem jullie aan de hand van stappenfoto's mee in het proces.
-
Hello everyone,
Back from holiday and guess what was waiting for me? A big package filled with a lot of stunning materials by Pronty Crafts. How much fun is it coming home to that?! So it was hard to choose with which I would start but today I will show you how you can use the Pronty Crafts mask stencils on a gelliplate. It doesn't matter what the size of the mask stencil is because you can just use a part of it.
I will show you step by step with a photo tutorial.


Leg een gelliplate (4 inch) op een acrylblok. Breng hierop wat inkt aan en rol deze uit met een brayer totdat je een egale kleur krijgt.
-
Adhere a gelliplate (4inch) to an acrylic block. Put some ink on it and spread it out evenly by using a brayer. 


Ik heb de mask stencil 470.805.037 gebruikt en hiervan alleen een hoek op de gelliplate gelegd. Hierna ben ik er met de brayer enkele malen voorzichtig, en met weinig druk, overheen gerold. 
-
I've used the mask stencil 470.805.037 and just used a corner of it to put on the gelliplate.
After that I've used the brayer to roll over it several times and with light pressure.


Ik breng nu een andere kleur inkt aan op mijn Pronty Crafts craft sheet en rol mijn brayer erdoor totdat deze egaal gekleurd is.Daarna ga ik met mijn brayer nog één of twee keer over de gelliplate
-
I now put a different colour of ink on my Pronty Crafts craft sheet and roll my brayer through it until it's evenly covered. I then take the brayer and roll it over the gelliplate one or two times. 


Vervolgens pak ik mijn acrylblok, met gelliplate erop, op en druk ik deze als een stempel af op mijn aquarelpapier. Dan draai ik het geheel om en wrijf ik met mijn hand het papier goed aan. Als je goed kijkt kunt de je kleurvlakken al zien.
-
Next I take my acrylic block, with the gelliplate on it, and use it as a stamp on my watercolour paper. I then turn the whole thing over and gently rub the paper with my hand.
If you look closely you can already see the colours.


En zo ziet de afdruk er dan uit. Om de afdruk meer accent en diepte te geven, bewerk ik deze met een aantal aquarelpotloden.
-
And this what the print looks like. To add a little more accents en depth to the print I've used some watercolour pencils.


Als dat klaar is, zet ik met een witte acrylmarker nog wat witte stipjes als extra accent. Nu is de achtergrond klaar om op te stempelen.
-
I've added a few more accents by using an acrylic marker to place some dots. Now the background is ready for stamping.


Deze stijlvolle kaart is dan mijn eindresultaat. Ik hoop dat ik jullie heb mogen inspireren om ook met de mooie Pronty Crafts spullen aan de slag te gaan.

Hartelijke groet,

This stylish card is my end result. I hope I've inspired you to use the beautiful Pronty Crafts products as well.

Kind regards,


zondag 6 augustus 2017

Art Journal - mask stencils - Summertime..time to relax

Art Journal
Zomer.. vakantietijd.. even alles los laten.. relaxen
Het is vandaag aan mij om een creatie met fototutorial te laten zien.
-
Summer.. holiday .. let it all go.. relax..
Today it's up to me to show you a creation with  step by step photo tutorial.


Ik ben aan de slag gegaan met een art journal, verf en verschillende Pronty Crafts mask stencils.
 -

I used my art journal, acrylic paints and several Pronty Crafts mask stencils.


Eerst bewerk ik de pagina's met vier kleuren verf.
 -
First I added four different colours of acrylic paint to both pages.


Hierna werk ik met de verschillende mask stencils en delen van de stencils over elkaar heen.
-
I've used several mask stencils and parts of the stencils on top of each other.


Nadat ik de mask stencils heb toegepast accentueer ik deze met wit op beide pagina's.
 -
After using the mask stencils I also use white paint to make accents on each page.

De bloemafdruk, de gebruikte druppels en stippen laat ik nog meer naar voren komen door deze te accentueren in zwart en wit. Ik heb een aantal willekeurige woorden geprint en gebruikt.
 -

To accentuate the flowerprint, bubbles and dots I use a black and white paint marker. Random words were typed, printed and used.


Voor deze pagina's heb ik de Pronty Crafts mask stencils gel bubble 470.803.035, dots 470.438.188 en gel lines and dots 470.805.038 gebruikt.
 -
For these pages I used Pronty Crafts mask stencils gel bubble 470.803.035, dots 470.438.188 and gel lines and dots 470.805.038.


Deze zomerse pagina's zijn nu klaar en dit is dan het eindresultaat!

Ik hoop dat je hebt genoten van deze blogpost en uitleg en dat je inspiratie gekregen hebt om ook aan de slag te gaan met een eigen art journal!

Hartelijke groet,
-
The spread in my journal is now ready and this is how it looks!

I hope you've enjoyed my blogpost with tutorial and that it inspired you to start your own art journal!

Kind regards,


vrijdag 4 augustus 2017

And the winner is...

Hallo blogvolgers en lezers,
-
Hello readers en followers of this blog

Iedereen die hier regelmatig komt en ook nog eens volger van ons blog is, vriendelijk bedankt. Bijna 150 volgers in een maand, dat is niet mis.
-
Thank you to everyone who visits our blog and even better has become a follower. Almost 150 followers, that's great.

Wij hopen dat jullie blijven komen om de mooie workshops van onze Pronty Crafts Creators te bekijken.
-
We hope you will continue coming here to follow the inspirational workshops by our Pronty Crafts Creators.

We hebben een winnaar gekozen uit de 136 volgers, deze persoon krijgt een verrassingspakket met veel Pronty Crafts producten.
-
We have chosen a winner from the 136 followers, this person gets a surprise package filled with many Pronty Crafts products.


Wat er in zit dat blijft nog even geheim, misschien duurt de verzending door de vakantie iets langer.
En de winnaar is DEBBY !!! Gefeliciteerd Debby!
Stuur jij ons een mail met jouw gegevens op social@pronty.nl? -
The content will stay a secret for the moment. And the winner is Debby!!!

Dank aan iedereen voor de reacties op de workshops, ik hoop dat jullie onze bijdragen blijven waarderen.
-
Thank everyone for the comments to the workshops, I hope you will continue to appreciate our contributions.

Namens het team,
-
On behalf of the team,


woensdag 2 augustus 2017

Mdf storage unit with drawers

En dan zit de eerste maand van ons nieuwe blog er al weer op en mag ik de spits afbijten voor de tweede maand.
-
The first month of our new blog has already come to an end so now it's up to me to do the kick off of the second month.


Ik ben dol op het Pronty Crafts mdf en ben deze keer aan de slag gegaan met het opbergkastje 460.423.640.
-
I just love the Pronty Crafts mdf and so I decided to decorate the storage unit 460.423.640 this time.


Eerst teken ik alle onderdelen met potlood om op een stuk designpapier en knip ik deze uit. Ik hou hierbij ook rekening met den gleufjes.
-
I start off by drawing all the parts on some designpaper with a pencil and I make sure to also include the slots.


Daarna plak ik al het papier van op het mdf met wat alleslijm en vervolgens bewerk ik de randjes met inkt en witte gesso.
-
I then glue on all the papers by using some multi purpose glue and afterwards I ink the edges and paint them white with some white gesso.


Als alle losse onderdelen klaar zijn kan het kastje in elkaar gezet worden.
-
When all the parts are ready it's time to put the storage unit together.


Bij dit kastje zit een handig stencil om lades te maken en dus ben ik ook daarmee aan de slag gegaan.
-
In the packaging of this storage unit there's also a template to make some drawers and so I decided to use it for this project.


Teken de mal om op stevig cardstock en knip deze uit.
-
Draw the template on a piece of sturdy cardstock and cut it out.


Op de voorkant van de lades heb ik vervolgens een patroon aangebracht met behulp van verschillende toffe Pronty Crafts stencils en wat inkt.
-
On the front of the drawers I've used a couple of the awesome Pronty Crafts mask stencils in combination with some ink.


Hier heb ik stencil Gel Flower 470.803.040 gebruikt.
-
Here I've used the mask stencil Gel Flower 470.803.040.


De andere lades zijn gedaan met stencils 470.801.040, 470.438.188 en 470.438.187.
-
For the other drawers I've used the mask stencils 470.801.040, 470.438.188 and 470.438.187.


 Nog wat gestanste vlinders aan de zijkanten en mijn creatie is klaar om cadeau te doen. Ik hoop dat ik jullie weer heb mogen inspireren om ook met de mooie Pronty Crafts spulletjes aan de slag te gaan.

Hartelijke groet,
-
I've added some die cut butterflies to the sides and now my creation is ready to give away as a gift. I hope I've inspired you again to use the beautiful Pronty Crafts products.

Kind regards,